
This tutorial was written 11th May, 2007 by Trixie.
For this tutorial you will need the following:-
A graphic of your choice with equal sides - eg 400x400
FM Tile Tools
VM Extravaganza
Plugins can be downloaded here
O.k.........Let's get started!
1. Open your graphic in PSP. Go to Window/Duplicate and close your original.
2. Resize graphic to 400 x 400.
3. Using the Dropper Tool, choose a medium colour from your graphic and place it in the Foreground of the Materials Pallet.
4. Now choose a dark colour from your graphic and place it in the Background of the Materials Pallet.
5. Image/Add border - 2px symmetric - using the Foreground colour.
6. Image/Add border - 2px symmetric - using the Background colour.
7. Image/Add border - 35px symmetric - using the Foreground colour.
8. Select the 35px border with the Magic Wand - using these settings:

9. Effects/Plugins/VM Extravaganza/Picture in a Picture - using these settings:

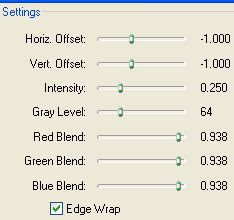
10 . Effects/Plugins/FM Tile Tools/Blend Emboss - using these settings:
11. Selections/Select none.
12. Image/Add border - 2px symmetric - using the Background colour.
13. Resize framed graphic if necessary, add your Watermark and you're done!
Another example: