
This tutorial was written 12th April, 2007 by Trixie.
For this tutorial you will need the following:
PSP 9 but can be achieved with other versions of PSP.
Gold Pattern here
Corners of your choice
A graphic of your choice.
Simple Plugin
FM Tile Tools Plugin
Xero Plugin (I suggest you download the 4 of them because they are nice to have)
Plugins can be downloaded here
Right click and save the gold pattern to your pattern folder.
O.k......Let's get started!
1. Open up your graphic in psp. Windows/Duplicate. Close the original as we shall work with the Duplicate.
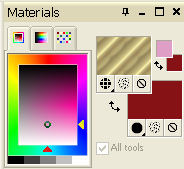
2. Set the Gold Pattern as the Foreground in you Materials Pallet and set the Background with a colour from your Graphic.
3. Image/Add border -1px Symmetric - using a colour that is not in your image.
4. Select the border with the Magic Wand.

5. Flood fill with the Gold Pattern.

6. Select/Select none.
7. Image/Add border - 2px Symmetric - using your Background colour.
8. Repeat Steps 3 to 7 inclusive twice.
9. Image/Add border - 20px Symmetric - using your Background colour and Select border with Magic Wand
as before.
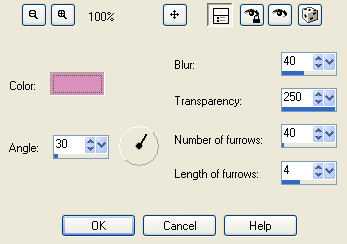
10. Effects/Texture Effects/Fine Leather - using these settings and using a much lighter colour in the same tonings as your Background colour. This will give a bit of light and shade to the frame.
11. Repeat Steps 3 to 7 inlusive 3 times.
12. Image/Add border - 35px Symmetric - using Background colour and Select with Magic Wand as before.
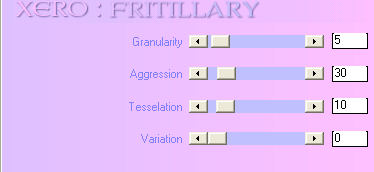
13. Effects/Plugins/Xero/Fritillary - using these settings:
14. Effects/Plugins/FM Tile Tools/Blend Emboss - using these settings:

15. Repeat Steps 3 to 7 inclusive 3 times.
16. Open up the Corner in PSP and click on the Blue Bar to activate.
17. Edit/Copy
18. Activate your framed image - Edit/Paste as New Layer.
19. With the mover tool, move the corner to the top left of your framed image.
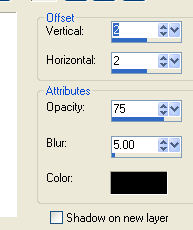
20. Effects/3d Effects/Drop Shadow - using these settings:
21. Effects/Plugins/Simple/4 Way Average. You should now have a corner in each of the four corners.
22. Layers/Merge/Merge All Flatten.
23. Add your watermark and resize if necessary.
That's it! Your done. I hope you enjoyed creating this frame.